Windows computers often encounter fatal errors where users have to apply different advanced troubleshooting methods to get their systems functioning again.
But in some situations, there’s no other thing to do than reinstall their operating systems. However, in true Windows fashion, there are different routes to take in this case.
You can either choose to reimage or format your system. And whichever one you select, you still have options.
While both options sound similar, they have some nuances. This article will cover how to reimage a computer and the difference between reimaging and formatting.
What is a Reimage Computer Process?
A reimage repair refers to reinstalling an operating system on a computer from scratch. The process involves clearing or wiping the hard drive entirely while preserving only the OS. The system feels like a new machine once the process is complete because only default operating system drivers, applications, and files will be preserved.
People choose the reimage computer option when they forget their passwords, are dealing with fatal errors, or have to sell or pass off the computer to someone else or a new employee.
How is Different from Formatting?
Reformatting (or formatting) and reimaging a computer both involve reinstalling the operating system and deleting personal files and applications. But that’s where their similarities end.
Unlike reimaging, reformatting involves deleting everything on the hard drive including the operating system. A user can then choose to reinstall the operating system afresh or go for a different one.
Another difference is that reimaging reinstalls your existing operating system, which implies that you don’t have to provide your license key. When you reformat, you have to provide the key.
How to Reimage a Computer
The reimaging process can also be called a restore process or factory reset. There are different ways to achieve it and they include:
- Using your OEM’s restore tool or drive
- Using a backed up Windows image
- Using Windows’ reset option
Before you begin, it will be a good idea to back up important personal files as they’ll be lost during the process.
Reimage Your Computer Using Your Recovery Drive
PC manufacturers normally add a recovery drive to their PCs to allow users to restore their computers to factory settings in case anything happens. These drives are typically small partitions on the hard drive shipped with the system.
In some rare cases, the system ships with recovery DVDs, though that method may long be phased out.
To run the recovery, you have to tap some special keys during your system’s boot process to enter the recovery environment. You can also use the PC manufacturer’s software program to activate the recovery process.
If the drive is visible in This PC, you can open it and launch the setup in some cases.
That said, you can easily find out how to factory reset your PC using the OEM’s recovery tool by going to their website and reading their guide.
Using the Backup and Restore Option
If you created a backup using the Backup and Restore option in Control Panel, you can restore your Windows image file and get things running again.
The backed up image contains all the settings, applications, components, and packages running on the operating system at the time you created it. Once you restore it, you get everything back, instead of losing files and applications.
Follow these steps on Windows 10 and Windows 11 to restore the image if you created one:
1. Insert the external drive where you created the image.
2. Open the Run dialog box by hitting the Windows and R keys on your keyboard simultaneously.
3. After that, type Control Panel and hit the Enter key or click on OK.
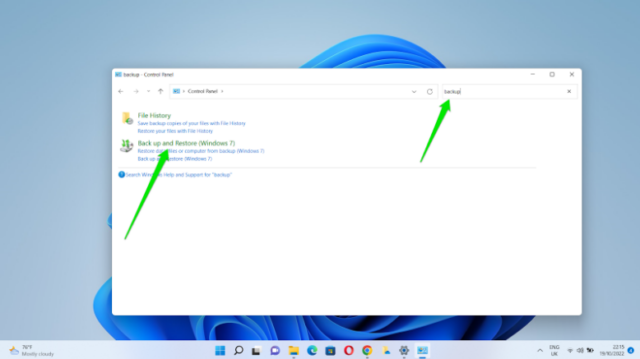
4. Once the Control Panel opens, go to the search box in the top-right corner and type “backup.”
5. Click on Backup and Restore (Windows 7).
6. After the Backup and restore page appears, go to the Restore section and select the drive you inserted.
7. Follow the subsequent prompts to complete the process and Windows will restore your image.
Unfortunately, you won’t be able to restore your system image if you did not create one.
In the future, it’s important that you do.
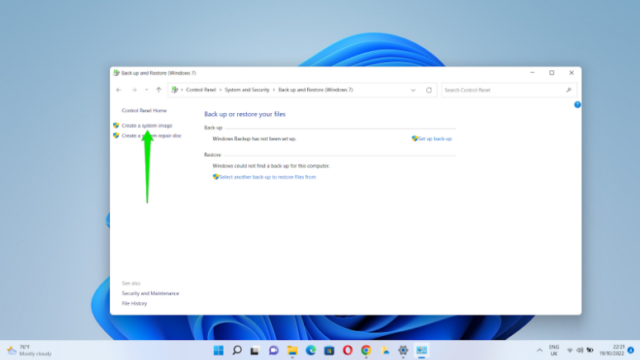
Head to the Backup and Restore page and select the “Create a system image” option on the left side of the window.
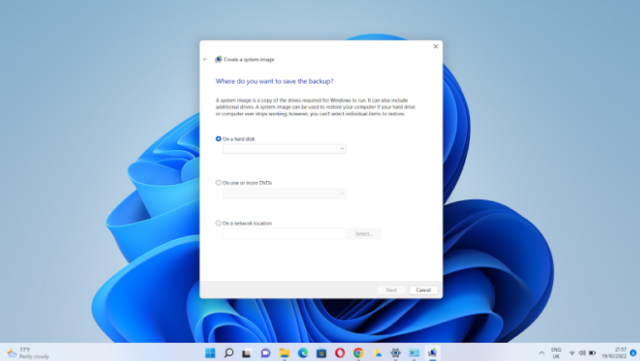
You’ll see a page asking where you want to save the backup. We recommend using a reliable external drive. Select the hard disk option, then choose the drive and click on Next.
Follow the instructions that appear on the screen to complete the process.
Using the Reset this PC Option in Windows Settings
The process is different on Windows 11 and Windows 10.
Follow these steps on Windows 11:
1. Open the Windows Settings application by hitting the Windows and I keyboard buttons together.
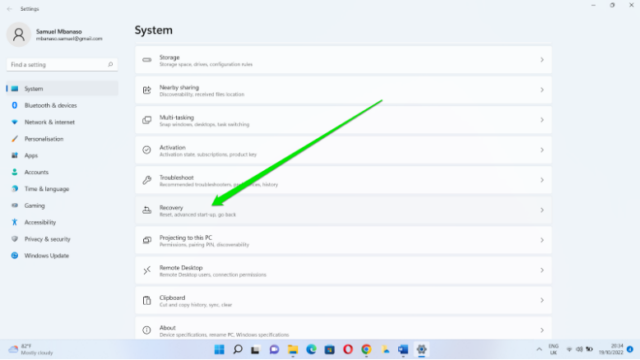
2. Once Settings launches, scroll through the System page and click on Recovery.
3. After the System > Recovery page shows up, click on the Reset PC button on the left side of Reset this PC.
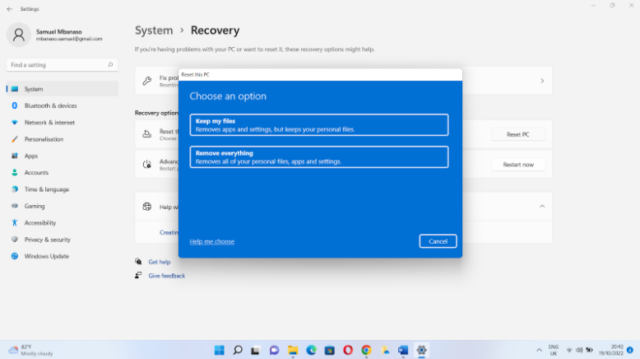
4. Once the setup dialog window opens, select Remove Everything.
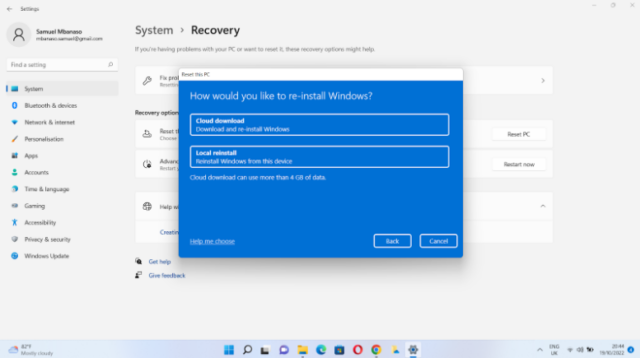
5. The next page will give you two options: Cloud download and Local reinstall.
6. Choose the cloud download option if you want the setup to download the latest version of Windows 11 and install it. As the page says, it could consume more than 4 GB of data.
7. You can use the Local reinstall option if you’re comfortable with the current version of Windows running on your PC.
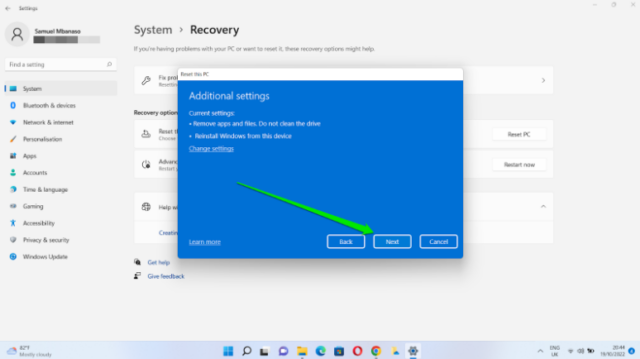
8. The next page gives you an opportunity to reconsider your options so far. If you’re sure you want to continue with them, click on the Next button.
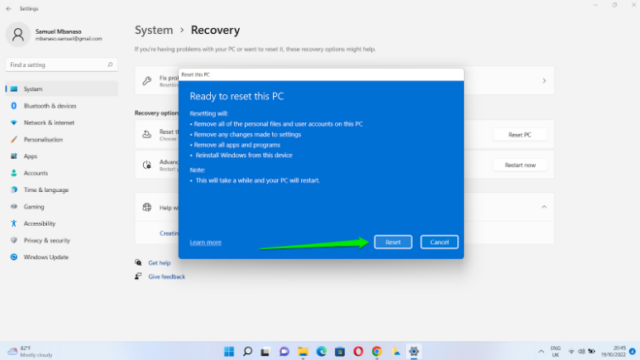
9. The “Ready to reset this PC” page provides a summary of what will happen during the reimage process.
10. Click on the Reset button to kick things off.
You’ll now see a screen that says, “Preparing to reset” with a progress status. Your computer will restart multiple times throughout the process and you’ll see a Resetting this PC screen.
Once the installation is complete, Windows will ask you to select some setup preferences to add the finishing touches. You may be asked to log into your Microsoft Account before the operating system takes you to your desktop.
You’ll notice that your PC is now clean as new, without any third-party applications, except basic default Windows 11 programs such as Teams and Microsoft Edge and maybe some manufacturer apps.
Follow these steps if you’re running Windows 10:
- Right-click on the Windows logo in the taskbar and click on the Settings option in the Power User menu.
- After the Settings program launches, head to the bottom of the interface and click on Update & Security.
- Once you see the Windows Update screen, go to the left side of the page and select Recovery.
- Now, go to the Recovery page and click on the Get Started button under “Reset this PC.”
- Once the setup dialog window opens, select Remove Everything.
- The next screen will give you two options: Cloud download and Local reinstall.
- Choose the cloud download option if you want the setup to download the latest version of Windows 10 and install it.
- You can use the Local reinstall option if you’re comfortable with the current version of Windows running on your PC.
- The next page allows you to reconsider your options so far. Click on Next if you want to stick with them.
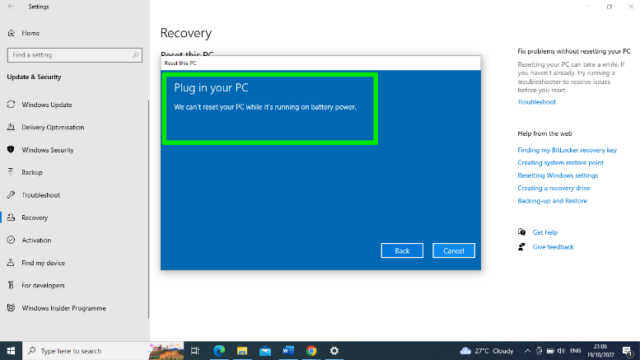
Note: The setup won’t reset your machine if it’s running on battery power. It will notify you to plug in your PC before it can continue.
- Once you plug in your computer, the “Ready to reset this PC” page will provide a summary of what will happen during the reimaging process.
- Click on the Rest button to start.
It will follow the same process as Windows 11 until it removes everything and takes you to your Desktop.
How to Reset Windows Through the Advanced Start-Up Environment
Whether you’re running Windows 10 or 11, you can reset your PC through the advanced start-up environment, which is also called the recovery or startup repair environment.
There are different ways to get to that environment, depending on the operating system you’re running and the state of your computer.
Let’s show you the different ways to open the advanced startup page:
First Method: Through the Sign-In Page
If your PC boots to the sign-in page, you can click on the power icon, hold down the shift button on your keyboard, and select Restart from the power menu. This process works for Windows 10 and Windows 11.
Second Method: Through the Settings Application
Windows 10 and Windows 11 have different Settings interfaces. So, you’ll show you how to navigate each.
Let’s start with Windows 11:
- Launch Settings.
- Scroll through the System page and click on Recovery.
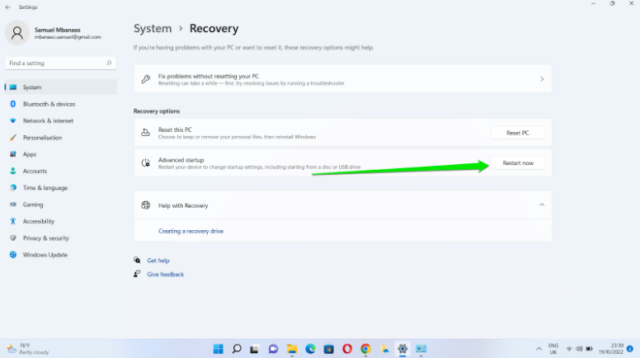
- After the System > Recovery page shows up, click on the Restart Now button next to Advanced Startup.
Follow these steps for Windows 10:
- Launch Settings.
- After the Settings program launches, click on Update & Security.
- Once you see the Windows Update screen, go to the left side of the page and select Recovery.
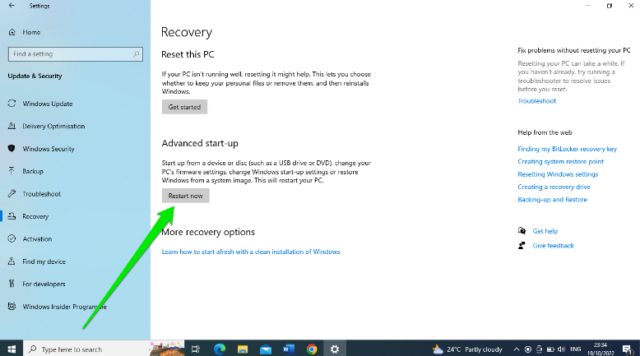
- Now, go to the Recovery page and click on the Restart Now button under Advanced Start-Up.
Third Method: From the Boot Page
Sometimes, you may be forced to go to the repair screen because you can’t sign in to your computer or an error has thrown it into a restart loop. This could be a blue screen or hardware failure.
This method allows you to go to the advanced startup page to reset your computer.
To start, you have to completely turn off your PC. If it’s stuck in a restart loop, press and hold the power button until the computer shuts down.
After the system shuts down, press the power button to turn it on. Now, make sure you press and hold down the power button again immediately your PC manufacturer’s logo flashes on the screen.
Turn the PC on again and turn it off again once you see the logo.
After turning on the computer the third time, Windows will take you to the Automatic Repair screen.
After you get there, click on the Advanced options button to open the Advanced Startup page.
Reset the PC
The process is straightforward once you get to the Choose an Option screen in the Advanced Startup environment. Follow these steps:
- Select Troubleshoot on the first page.
- Click on Rest this PC once you the Troubleshoot page.
- Next, select Remove Everything.
- After that, click on the Local Reinstall option.
- Now, the next page will ask to remove your files or fully clean your drive.
- The first option instructs Windows to delete your personal files, but those files can be recovered later by a recovery program. You can choose that option if you’ll continue using the computer.
- The second option prompts Windows to clean the drive so that the files won’t be recoverable. You can choose this option if you’re handing the PC to someone else or if the issue you’re experiencing persists after choosing the first option.
- Click on the Reset option to start the process.
Conclusion
That’s how to reimage your Windows PC. Remember to create a backup image so you won’t have to lose so much whenever you reimage your PC in the future. You should also create a recovery CD if you have a manufacturer recovery partition.

