
Looking to upgrade your ride with the magic of LED light bars? Their brilliant illumination and sleek style are addicting! But how do you install LED light bars properly to create a custom look? With these easy LED installation tips, you’ll be enhancing your car in no time.
Bar Setup

First, determine the optimal placement for your LED light bar setup. Most mount to the roof, hood, bumper or brush guard for max visibility. For a low-profile look, you could install small LED pods discreetly behind the grill too. Plan your design before starting to drill or stick anything.
Next, check that the mounting location is flat and lacks obstructions. Hold the LED light bar in place to visualize the fit. Ensure it doesn’t cover vents, wiring or other critical components underneath. Measure twice to avoid drilling extra unnecessary holes later on. If you are on the lookout for LED light bars, you better upgrade to stylish and functional LED light bars from au.vicoffroad.
Mounting
Now prep the mounting surface so the LED light bar adheres securely. Start by cleaning the area thoroughly with rubbing alcohol to remove any grease or debris. Scuff it up a bit with 120 grit sandpaper for optimal grip.
Time to mount the adjustable LED brackets to your vehicle. Many LED bars include quality 3M adhesive pads for secure stick-on mounting. Just peel and mount to prepped metal or plastic surfaces. For roof mounting, stainless steel bolts often work best. Apply silicone sealant around holes drilled through the roof to prevent leaking.
Carefully wire the LED light bar to your vehicle’s battery source (not directly to the alternator). Red is positive, black is negative. Using the included wiring harness, connect the relay to a fuse block or directly to the battery if you know how. This powers the LEDs.
Next, thread and secure the wiring harness along the vehicle’s frame, hidden beneath trim panels. Avoid having wires loosely hanging to prevent snagging. Connect the LED switch to a clean power source through an empty fuse slot. Test it works before moving on.
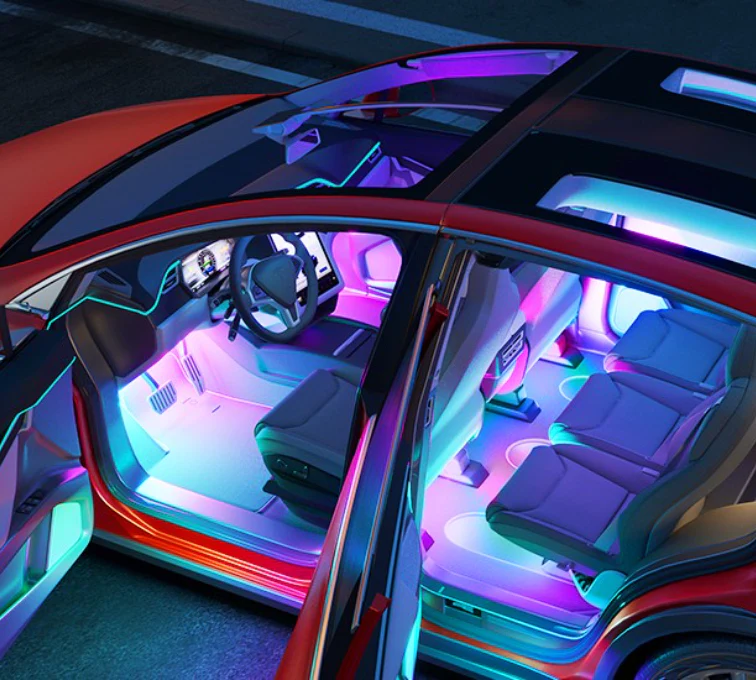
With the bars and wiring complete, the fun begins – customizing the exact LED setup of your dreams! Determine how many rows of LEDs you desire, along with single color or RGB color-changing abilities. Sync LEDs to music for a cool party effect too.
Adjustments

Don’t forget to aim your adjustable light bar once mounted. Optimal angle depends on the beam type – flood lights point down, spot straight ahead. Consider light bar covers or diffusers to reduce glare as needed. Add that finishing touch!
While following basic precautions, properly installing LED light bars is a very doable DIY job. Just take your time, follow proto-typing steps, use quality 3M adhesive, protect surfaces, and seal drilled holes. Wire out of sight using relays and fuses.
Soon you’ll be cruising in style with eye-catching LEDs adding premium flair. Customizing your ride is deeply rewarding. Just drive responsibly please! Let those brilliant LED light bars shine on without distracting other drivers.
With this straight-forward guidance, you can install LED bars like a pro. Trick out your vehicle with vibrant LED style at your own pace. Get creative designing the look that expresses your passion. Then drive off into the night glowing with customizable LED magic.
Ensure a Clean Mounting Surface
For secure LED mounting, thoroughly clean the chosen surface area beforehand. Remove any dirt, wax, rust or paint imperfections that could impact adhesion. Gently sanding and then wiping with alcohol preps the area for maximum stickiness.
This is especially important for exterior mounting as moisture or particles trapping behind the lights can make them fall off. Take your time cleaning the surface so the 3M adhesive or magnetic LED strips mount tightly.
Use Adhesive Backing or Mounting Brackets
Self-adhesive LED light bars make installation a breeze. Simply peel and stick once your mounting area is prepped. Apply firm, even pressure for at least 60 seconds to ensure a tight bond, then let it fully cure for 24 hours. With good adhesion, LED strips should withstand wind and weather.
Bracket mounting provides another sturdy option if your surface area lacks stickiness. LED bar brackets screw into place using existing holes or new ones you drill. Make sure to use exterior-grade screws to avoid rusting. Brackets allow adjusting angles as needed.
Minimize Visible Wiring
Nothing ruins the effect of sleek new LEDs like messy wires. Carefully route connecting wires to hide them as much as possible. Use trim pieces or natural crevices along edges whenever you can. Black wiring blends into dark wheel wells and bumpers discretely.
For a super clean install, look into “wireless” LED lights that connect via magnetic contacts or Bluetooth rather than actual wires. Hide the battery packs and connectors out of sight. With planning, you can pull off LED lighting that seems to magically illuminate sans wires.
Verify LED Bar Fit
It’s smart to do a test fit of your new LED bars first before permanently installing. That lets you adjust placement if needed for best alignment and fit. You also want to check that the lights don’t interfere with hood and trunk access or seat belts.
Temporary mounting putty holds strips in place for mock up test drives. Then when desired placement is confirmed, switch to actual adhesive or brackets for your finished install. This extra step helps avoid frustration down the road.
Connect to Your Vehicle’s Power System

Hardwiring LED light strips directly into your car’s 12-volt electrical system enables control right from your dashboard. But this does require safely tapping into the fuse box which is best left to professionals if you’re not experienced with electrical wiring.
Easier DIY options include plugging LEDs into your vehicle’s cigarette lighter or USB ports. You can also use standalone battery packs to power lights. Just remember to recharge them occasionally.
Program Your Lighting Displays
Once things are wired, have fun using your LED kit’s controller app to program eye-catching lighting displays. Whether you want pulsating color-changing patterns, preset mood lighting, or just basic on/off control, today’s LEDs are highly customizable.
Syncing your new lights to music takes things to the next level. Set streaming playlists, sound reactive modes, and brightness levels for the perfect ambiance. Share your tricked out LED ride with fellow car enthusiasts and get inspired by other creative mods.
With smart planning and strategic installation, it’s easy to customize your car with cool programmable LEDs. Just take time to map locations, prep mounting surfaces, minimize wiring, and tune lighting effects. Drive safe and let those new LEDs shine.


